Flying Geese
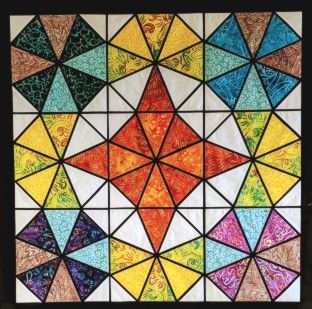
I am loving this time in the studio. I am working on projects that have been on my mind for a long time. My normal schedule (when we aren't getting ready for a show) is to come in and get the previous day's orders done and in the mail. Then I am sort of free to work on what I want. We are still (always) organizing and trying to get our "recording" room set up for making videos and such. But I always make time in my day to do some stitching and I usually have four or five different projects going on at one time. Its just how my brain works and I learned a long time ago not to argue with my natural instincts. I get bored working on a single project from beginning to end. So, I always have a couple of tops that need backing made to be ready for the long arm; like the Stained Glass Quilt. I usually always have a quilt on the long arm and will work a bit there. Then there are usually two or three that are in the piecing stage. I love working like this.
I finished the center portion of a little sampler quilt yesterday and started on the border blocks. The border is just a simple Flying Geese strip and is one I tend to use a lot. I like pieced borders on my foundations because it always makes the quilt lay or hang beautifully. It keeps the quilt shape perfectly so I don't get the wavy edges. Its hard to not get wavy edges if you are using a border of straight fabric. Its just a natural tendency for fabric to stretch and if we aren't careful when cutting those borders to be the exact same size on the opposite edges, its even harder to get rid of the waved edges.
Which brings me to what I wanted to share today. I know a lot of quilters really hate making Flying Geese. I have tried a lot of methods over the years, until I started making them on the foundations. I also know that there are ways of making them quickly but again, I like that the foundations keep them from stretching and Flying Geese have a lot of bias edges. I took pictures this morning while I was assembling a strip of Flying Geese for the border of this little sampler quilt. I would like to share with you a mini-class on making them.
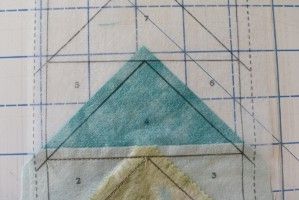
First of all, when cutting the pieces, for this particular table topper, I needed a total of 72 Flying Geese units (18 per side). These units measure 2" x 4" so I needed to cut 36 squares that measured 4 1/2". I then cut them once diagonally. I was using nine different fabrics so I cut one strip 4 1/2" wide by the width of the fabric. I left these fabrics folded as they came off the bolt and then I stacked them so I had three rows with three fabrics in each stack. I cut off the selvedge edge and then cut across the three stacks at 4 1/2" intervals (that is six layers of fabrics) until I had my 36 squares. Then I cut each stack of squares once diagonally and all of my pieces for the geese were done. Cutting does not have to be accurate like in traditional piecing. I repeated this process for cutting the background of the units. I needed 72 squares that were 3 1/2" square and then I cut them once diagonally to get my 144 half square triangles for the background.
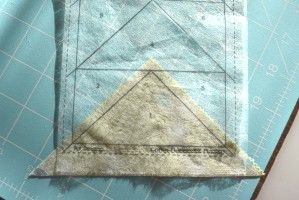
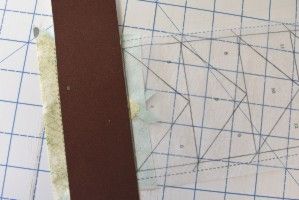
To begin, set a larger half square triangle with the wrong side facing up. Set the foundation block on top of the fabric with about 1/4" of fabric extending beyond the lines of space #1. When you have the foundation in this position, you want to be able to read the printing and you will be looking through the foundation to the wrong side of the fabric. You can either pin it to hold it in place or stitch across the bottom in the seam allowance as I did.
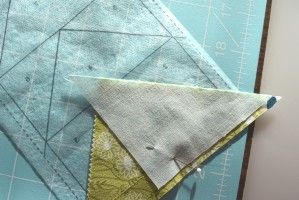
Turn the whole unit over so the right side of the fabric is facing up. Set a small background half square triangle even with the edge of fabric piece #1 where it extends the 1/4" into space #2. Be sure the right sides of the fabrics are facing each other. Pin to hold in place.
Turn the unit over so the foundation is facing up. Stitch on the line between space #1 and #2. Use a regular stitch length. You will be leaving the foundation in the quilt so you don't need to use a tiny stitch like you would if you were using paper.
Turn the foundation unit over so the fabrics are facing up. Set it on the ironing mat and open fabric piece #2 and press. I use a very low steam setting on my iron. I know that some quilters do not like to use steam and that is fine. The important thing is that you press it to get a nice flat seam. You are building seams across seams so if each seam is not pressed flat as you go, it will never be flat and you won't have a good crisp finish.
Add piece #3 in the same manner. Again, open it and press it nice and flat.
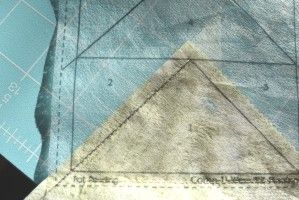
Set the unit on the cutting mat with the foundation side facing up. Set a straight edge even with the line between unit #1 (pieces #1,2 & 3) and unit #2 (piece #4).
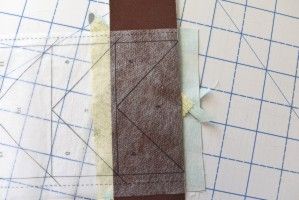
Fold the foundation fabric back over the straight edge to expose the fabrics underneath.

Snugly fit the Add-A-Quarter ruler against the straight edge. I know you can do this without the Add-A-Quarter ruler but it is so much easier with this special ruler. And, it is really the only tool you need to make any paper/foundation pieced block. Its definitely worth the small investment.
Use your rotary cutter to trim away the extra fabric. This leaves you a perfect 1/4" seam allowance so you know exactly where to set your next fabric piece and you know it will cover the space after it is stitched and opened.

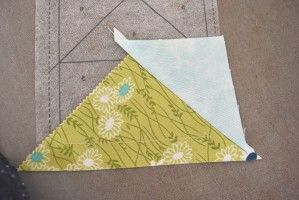
Turn the unit over so the right sides of the fabrics are facing up. Set the next larger half square triangle piece even with this edge that you just trimmed. Be sure you have the right sides of the fabrics facing each other. Pin to hold in place. Turn the unit over so the foundation is facing up. Stitch on the line between unit #1 and unit #2.
Set the unit on the ironing mat with the fabrics facing up. Open fabric piece #4 and press. If you stitched on the lines, you will get perfect points!
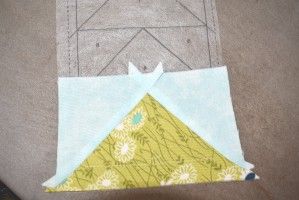
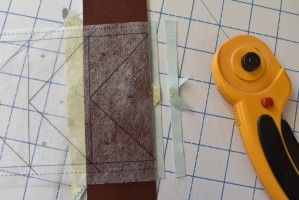
Set the unit on the cutting mat and use the straight edge, Add-A-Quarter ruler and the rotary cutter to trim both edges of fabric piece #4. You are then ready to add background piece #5 (stitch then press) and then background piece #6. Continue this process until the entire length of the foundation is covered.
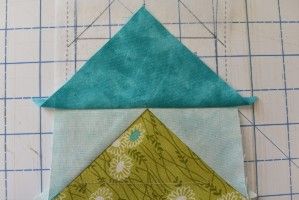
Once the length is completed, you will trim all four edges 1/4" from the outside solid line. If you need a long piece of Flying Geese, just join the foundations together as you would join any other blocks.
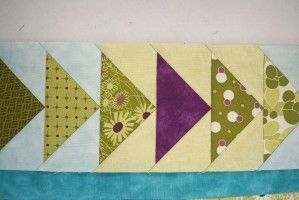
This strip has been trimmed and is ready to add to the turquoise inner border. When I sew this strip of Flying Geese to the inner border, I will stitch it with the foundation side facing up. I will stitch on the solid line so that my side points will be perfect.
Making these Flying Geese is painless and the perfect points are so pleasing and easy to achieve. We offer them in many different sizes, both in strips and in single block units.
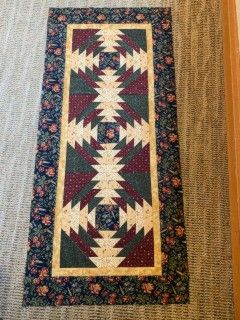
My friend Kathy sent me this picture last night. Many of you will remember Kathy from doing demos for us at the quilt shows. She is at a quilt retreat right now and finished this Pineapple Table Runner top last night. This was made from a fabric kit we have available. The fabrics are from Moda's "Kansas Troubles" line. It came out beautiful and perfect for the fall season.
I think its time I head back into the studio and get some work done. Stay safe, stay healthy and HAPPY QUILTING!